
개발자
[JSP 2일차] survelt(urlmapping)/action/include/forward/request/filter/Post만 받도록하는 서블릿/ 본문
[JSP 2일차] survelt(urlmapping)/action/include/forward/request/filter/Post만 받도록하는 서블릿/
GoGo개발 2022. 8. 30. 14:28suvelt 파일을 따로 만들어서 url mapping 해보기
: xml 파일대신 suvelt 클래스에 url mapping 을 해보겠다
(두 가지 클래스에 맵핑시키면 오류난다)
1. 05_get_post_Method.jsp
|
1
2
3
4
5
6
7
8
|
<form action="<%= ctxPath%>/05_get_post_Method.do" method="post">
<%--
/05_get_post_Method.do 에 대한 URL 처리는 web.xml에서 하지않고
서블릿클래스 @WebServlet에서 어노테이션을 처리해보겠다.
--%>
|
cs |
2. Get_Post_Method_05.java (서블릿)
|
1
2
3
4
5
6
7
8
9
10
11
12
13
14
15
16
17
18
19
20
21
22
23
24
25
26
27
28
29
30
31
32
33
34
35
36
37
38
39
40
41
42
43
44
45
|
package chap02;
import java.io.IOException;
import java.io.PrintWriter;
import javax.servlet.ServletException;
import javax.servlet.annotation.WebServlet;
import javax.servlet.http.HttpServlet;
import javax.servlet.http.HttpServletRequest;
import javax.servlet.http.HttpServletResponse;
@WebServlet("/05_get_post_Method.do")
//왓스가 재구동할때 서블릿 구동, 05_get_post_Method.do URL 있으면 아래부터 읽어들인다는 뜻
public class Get_Post_Method_05 extends HttpServlet {
private static final long serialVersionUID = 1L;
protected void doGet(HttpServletRequest request, HttpServletResponse response) throws ServletException, IOException {
// response.getWriter().append("Served at: ").append(request.getContextPath());
// 웹브라우저에 Served at: 글자쓰겠다 append는 추가하겠다는 뜻
String method = request.getMethod(); //전송방식이 뭐냐
// form 태그에서 넘어온 전송방식이 GET 방식이라면 "GET"이 나오고
// form 태그에서 넘어온 전송방식이 POST 방식이라면 "POST"가 나온다/
System.out.println("#### 확인용 : "+method+" 메소드가 호출됨 ####");
/*
post 방식으로 넘어온 데이터중 영어는 글자가 안깨지지만,
한글은 글자모양이 깨져나온다.
그래서 post 방식에서 넘어온 한글 데이터가 글자가 안깨지게 하려면
아래처럼 request.setCharacterEncoding("UTF-8"); 을 해야 한다.
주의할 것은 request.getParameter("변수명"); 보다 먼저 기술을 해주어야 한다는 것이다.
*/
request.setCharacterEncoding("UTF-8");
아래는 이전 포스팅과 같다
}
|
cs |
=> xml 없이 @WebServlet("/05_get_post_Method.do") 서블릿에 직접 맵핑했다 (어노테이션 이용 @~)
action
액션(action)이란?
XML 기술을 이용해서 기존의 JSP 문법을 확장해준 매커니즘으로 JSP 규격서에 정의되어 있는 기술이다. 이것은 XML 태그 형태를 띄기 때문에 액션태그(action tag)라고도 부르며, 간단히 액션(action)이라고 한다. 왜냐하면 이런 태그가 어떤 동작(action)을 수행하는 역할을 하기 때문이다.
※ 액션(action)의 2가지 종류
1) 표준액션(Standard action)
=> JSP 페이지에서 막바로 사용이 가능함.
2) 커스텀액션(Custom action)
=> 별도의 라이브러리를 설치해야만 사용가능함.
라이브러리는 인터넷에서 다운로드 받을수도 있고(JSTL),
사용자가 직접 만들어 사용할수도 있음.
※ 표준액션(Standard action)과 커스텀액션(Custom action)의 외형적 차이
1. 표준액션(Standard action)은
모든 태그의 이름 앞에 jsp 라는 접두어가 붙음.
예) <jsp:include page="abc.jsp" />
2. 커스텀액션(Custom action)은
모든 태그의 이름 앞에 jsp 이외의 다른 이름의 접두어가 붙음.
예) <c:set var="cnt" value="0" />
<예시>
1.include . jsp
|
1
2
3
4
5
6
7
8
9
10
11
12
13
14
15
16
17
18
19
20
|
<%@ page language="java" contentType="text/html; charset=UTF-8"
pageEncoding="UTF-8"%>
<%-- 필요한 클래스를 import하려면 <%@ page%> page directive(페이지 지시어)를 사용하여 import 를 한다. --%>
<%@ page import= "java.util.Date , java.text.SimpleDateFormat"%>
<%
// *** 현재시각을 알아오기 *** //
Date now = new Date(); // 현재시각 import 해줘서 오류안뜬다
String currentTime = String.format("%tF %tT %tA", now, now, now);
%>
© 이 웹페이지의 저작권은 이순신씨에게 있습니다<br/>
<span style="color : blue; font-weight : bold" ><%= currentTime%></span>
<%-- text/html 덕분에 HTML없어도 가능 --%>
|
cs |

2.1.include_execute. jsp
|
1
2
3
4
5
6
7
8
9
10
11
12
13
14
15
16
17
18
19
20
21
22
23
24
25
26
27
28
29
30
31
32
33
34
35
36
37
|
<%@ page language="java" contentType="text/html; charset=UTF-8"
pageEncoding="UTF-8"%>
<%
String now="이제는";
%>
<!DOCTYPE html>
<html>
<head>
<meta charset="UTF-8">
<title>JSP 표준액션 중 include에 대해서 알아봅니다. </title>
</head>
<body>
<h3>책소개</h3>
도서명 : 삼국지<br/>
저자 : 이순신<br/>
페이지: 300페이지<br/>
<%--
<div>
<%@ include file="01_include.jsp" %>
이걸로해주면 앞에 now 객체는 now1으로 해주어야한다. 아래와 다르게 파일소스가오는 것이어서 그렇다.
</div>
--%>
<div>
<jsp:include page="01_include.jsp" />
<%-- 돌린결과물의 html만 붙여주는것이다. 그래서 앞의 now 객체 중복이 아니라 그대로 두어도 된다.--%>
</div>
가격: 20,000원<br/>
</body>
</html>
|
cs |

forward
forward 는 :
1. 01exexute_01 .jsp
|
1
2
3
4
5
6
7
8
9
10
11
12
13
14
15
16
17
18
19
20
21
22
23
24
25
26
27
28
29
30
31
32
33
34
35
36
37
38
39
40
41
42
43
44
45
46
47
48
49
50
51
52
53
54
55
56
57
58
59
60
61
62
63
64
|
<%@ page language="java" contentType="text/html; charset=UTF-8"
pageEncoding="UTF-8"%>
<!DOCTYPE html>
<html>
<head>
<meta charset="UTF-8">
<title>JSP 표준액션 중 forward 에 대해서 알아봅니다.</title>
<script type="text/javascript">
//Function Declaration
function goSubmit() {
// 정규표현식으로 유효성 검사
const regExp = /^[0-9]{1,5}$/; /* 숫자 5자리까지? */
const frm = document.myFrm;
const num1 = frm.firstNum.value.trim();
const num2 = frm.secondNum.value.trim();
if( !(regExp.test(num1) && regExp.test(num2)) ) {
alert("숫자로만 입력하세요!!");
frm.firstNum.value ="";
frm.secondNum.value = "";
frm.firstNum.focus();
return; //종료
}
else { // 둘다 숫자인데 두번째 숫자가 첫번째보다 작을 때
if(Number(num1) > Number(num2)) { // 웹은 무조건 String 타입이니까
alert("첫번째 입력한 숫자가 두번째 입력한 숫자보다 작아야합니다.");
frm.firstNum.value ="";
frm.secondNum.value = "";
frm.firstNum.focus();
return; //종료
}
}
frm.action = "02_forward_calc_02.jsp";
// frm.method = "GET"; // method 를 명기하지 않으면 기본은 "GET" 이다. 대소문자 상관 X
frm.submit();
}// end of function goSubmit()------------------
</script>
</head>
<body>
<h2>입력한 2개의 수 사이를 누적한 값 알아오기 </h2>
<form name="myFrm">
<p>
첫번째 수 : <input type="text" name="firstNum" size="5" maxlength="5"/><br/>
두번째 수 : <input type="text" name="secondNum" size="5" maxlength="5"/><br/>
<button type="button" onclick="goSubmit()">계산하기</button>
</p>
</form>
</body>
</html>
|
cs |
frm.action = "02_forward_calc_02.jsp"; : 02_forward_calc_02.jsp 로 전송해준다
(서블릿으로 보내주는건데 여기서는 jsp파일이 서블릿이므로)
frm.submit(); : submit 해준다
- 유효성 검사도 실행페이지에서 해준다

2. 02_forward_calc_02.jsp (서블릿 역할을 한다)
|
1
2
3
4
5
6
7
8
9
10
11
12
13
14
15
16
17
18
19
20
21
22
23
24
25
26
27
28
29
30
31
32
33
34
35
36
|
<%@ page language="java" contentType="text/html; charset=UTF-8"
pageEncoding="UTF-8"%>
<% //01 폼태그 내용 가져오기
String str_firstNum = request.getParameter("firstNum");
String str_secondNum = request.getParameter("secondNum");
int firstNum = Integer.parseInt(str_firstNum); //유효성 검사는 앞페이지에서 다 해줬다
int secondNum = Integer.parseInt(str_secondNum); //따라서 exception 처리안해줘도 된다.
int sum = 0;
for(int i=firstNum; i<=secondNum; i++) {
sum += i;
}
//결과물은 sum 이다.
//System.out.println("sum =>" +sum);
!!!! 중요 꼭 암기 !!!!
== request 내장객체는 클라이언트( 02_forwardCalc_execute_01.jsp ) 가
보내온 데이터를 읽어들이는 역할( request.getParameter("name명"); )도 있고
또한 어떤 결과물을 저장시키는 저장소 기능( request.setAttribute("키", 저장할객체); ) 도 있다.
// request.setAttribute("sum", new Integer(sum)); //sum이 wrapper클래스로 바뀜
// 원래는 위처럼 객체로 만들어서 저장을 해야 하지만 자바가 알아서 auto boxing(자동적으로 객체로 만들어주는 것) 해주기 때문에 아래처럼 쓸 수 있다.
request.setAttribute("sum", sum); // 원시형 데이터타입 autoboxing 되니까
%>
<jsp:forward page="02_forward_calc_view_03.jsp"/> <!--sum 꺼내서 03에 보내준다 내용물 포워드 해준다 -->
<%--
웹브라우저 상에서 URL 주소는 그대로 http://localhost:9090/JSPServletBegin/chap03_StandardAction/02forwardCalc_02.jsp 인데
웹브라우저 상에 보여지는 내용물은 http://localhost:9090/JSPServletBegin/chap03_StandardAction/02forwardCalc_view_03.jsp 의 내용이 보여진다.
--%>
|
cs |
- <jsp:forward page="02_forward_calc_view_03.jsp"/> : 03 jsp로 으로 내용을 보내준다. (forward)
03페이지로 넘겨준다
request.setAttribute("sum", new Integer(sum)); : sum 값을 저장시킨다
request.getParameter("firstNum"); :폼태그 내용을 가져온다
<requset의 두가지 역할>
1).getParameter : 보내온 데이터를 읽어들이는 역할( request.getParameter("name명"); )도 있고
-->form 태그 값을 가져오는 것
2.)setAttribute, getAttribute : 저장시키는 저장소 기능( request.setAttribute("키", 저장할객체); ) 도 있다. / 저장소에서 불러
-ㅡ> getAttribute : setAttribute된 것을 불러오는것

3. 02_forward_calc_view_03 .jsp
<첫번째 방법> 스크립틀릿을 이용한것
|
1
2
3
4
5
6
7
8
9
10
11
12
13
14
15
16
17
18
19
20
21
22
23
24
25
26
27
28
29
30
31
32
33
34
35
36
37
38
39
40
41
42
43
44
45
46
47
|
<%@ page language="java" contentType="text/html; charset=UTF-8"
pageEncoding="UTF-8"%>
<%
int firstNum = (Integer) request.getAttribute("firstNum"); // 오토 언박싱
// auto Unboxing(Integer ==> int) int로 캐스팅 한뒤 오토박싱
int secondNum = (Integer) request.getAttribute("secondNum"); // 오토 언박싱
// auto Unboxing(Integer ==> int)
int sum = (Integer) request.getAttribute("sum"); // 오토 언박싱
// auto Unboxing(Integer ==> int)
//02에서 넘겨준 값 받아오기
//////////////////////////////////////////
String str_firstNum = request.getParameter("firstNum");
String str_secondNum = request.getParameter("secondNum");
// 02가 포워드해줘서 03도 폼태그 읽어오기 가능
%>
<!DOCTYPE html>
<html>
<head>
<meta charset="UTF-8">
<title>계산된 결과값을 보여주는 곳</title>
</head>
<body>
<h3>계산된 결과값 -1</h3>
<%=firstNum%>부터 <%=secondNum%>까지의 누적의 합은?<br/>
결과값 : <span style="color : red"><%=sum %></span>
<hr style="margin:10px 0;">
<h3>계산된 결과값 -2</h3>
<%=str_firstNum%>부터 <%=str_secondNum%>까지의 누적의 합은?<br/>
결과값 : <span style="color : red"><%=sum %></span>
<!-- 노란줄 ctrl a , x, v -->
</body>
</html>
|
cs |
request.getAttribute("firstNum"); : 02에서 forward 해주고 setAttribute에 저장시켜놓은 값을 getAttribute로 가져온다
request.getParameter("firstNum");: 02에서 forward 해주어서 01의 폼태그를 getParameter로 바로 불러올 수도 있다.
<%=sum%> 형식으로 나타낸다.
<두번째 방법> - scope /EL을 이용한것
${requestScope.firstNum} or ${firstNum}
-request영역내에있는 키값 or 키값
(session 영역이 있다면 첫번째처럼 써주어야한다. 영역은 다른데 키 값은 firstName으로 똑같을 수 있기 때문이다)
<jsp:useBean> 표준액션의 scope ==>
자바빈즈를 객체화 시킨 후 이 객체를 어느 범위까지 사용할지를 결정하는 것이다.
1.scope="request" - 이 객체는 요청된 JSP 페이지내에서 사용된 후 , 이 JSP 페이지와 연결된 다른 JSP 페이지까지 사용되어진다. 연결된 다른 JSP 페이지에서 실행 종료와 함께 객체는 자동으로 소멸된다. request 영역에서 이 객체가 있으면 생성된 객체를 사용하고 없으면 객체를 새로이 만들어 request 영역에 올려둔다.
2. scope="session" - 이 객체는 세션이 종료(소멸)할때 까지 객체는 소멸하지 않고 사용된다. 세션이 종료(소멸)되는 순간 이 객체는 자동으로 소멸된다. session 영역에서 이 객체가 있으면 생성된 객체를 사용하고 없으면 객체를 새로이 만들어 session 영역에 올려둔다.
|
1
2
3
4
5
6
7
8
9
10
11
12
13
14
15
16
17
18
19
20
21
22
23
24
25
26
27
|
<%@ page language="java" contentType="text/html; charset=UTF-8"
pageEncoding="UTF-8"%>
<!DOCTYPE html>
<html>
<head>
<meta charset="UTF-8">
<title>계산된 결과값을 보여주는 곳</title>
</head>
<body>
<h3>계산된 결과(EL을 사용한것)</h3> <!--request.영역내에있는 값 , session이면 session.-->
${requestScope.firstNum}부터 ${requestScope.secondNum} 까지의 누적의 합은?<br/>
결과값 : <span style="color : red">${ requestScope.sum}</span>
<!-- (session 영역이 있다면 첫번째처럼 써주어야한다. 영역은 다른데 키 값은 firstName으로 똑같을 수 있기 때문이다) -->
<hr style="margin:10px 0;"> <h3>계산된 결과값(EL을 사용한것)</h3> <!--영역내에있는 키값 -->
${firstNum}부터 ${firstNum}까지의 누적의 합은?<br/>
결과값 : <span style="color : red">${requestScope.sum}</span>
</body>
</html>
|
cs |

forward 와 action 모두 종합적으로
:위 와는 다르게 java 클래스를 서블릿으로 했다. 그래서 forward 사용법이 다르니 주의하자.
1일차는 java클래스를 서블릿으로 2일차를 jsp를 서블릿으로 사용했으니 주의해서 보자
1. 실행페이지 (main)
1-1 첫번째 방법 : 04_forward_form_execute_01.jsp
|
1
2
3
4
5
6
7
8
9
10
11
12
13
14
15
16
17
18
19
20
21
22
23
24
25
26
27
28
29
30
31
32
33
34
35
36
37
38
39
40
41
42
43
44
45
46
47
48
49
50
51
52
53
54
55
56
57
58
59
60
61
62
63
64
65
66
67
68
69
70
71
72
73
74
75
76
77
78
79
80
81
82
83
84
85
86
87
88
89
90
91
92
93
94
95
96
97
98
99
100
101
102
103
104
105
106
107
108
109
110
111
112
113
114
115
116
117
118
119
120
121
122
123
124
125
126
127
128
129
130
131
132
133
134
135
136
137
|
<%@ page language="java" contentType="text/html; charset=UTF-8"
pageEncoding="UTF-8"%>
<%
// 컨텍스트 패스명(context path name)을 알아오고자 한다.
String ctxPath = request.getContextPath();
// ctxPath => /JSPServletBegin
%>
<!DOCTYPE html>
<html>
<head>
<meta charset="UTF-8">
<title>POST 방식으로 데이터 전송하기</title>
<style type="text/css">
ul {list-style-type: none;}
li {line-height: 200%;}
</style>
<script type="text/javascript" src="<%= ctxPath%>/js/jquery-3.6.0.min.js"></script>
<script type="text/javascript">
$(document).ready(function(){
// $("form[name='registerFrm']").bind("submit", function(){
// 또는
// $("form[name='registerFrm']").submit(function(){
// 또는
$("form[name='registerFrm']").submit(() => {
// === 유효성 검사 === //
// 1. 성명
const name_length = $("input:text[name='name']").val().trim().length;
if(name_length == 0) {
alert("성명을 입력하세요!!");
$("input:text[name='name']").val("").focus();
return false; // submit 을 하지 않고 종료한다.
}
// 2. 학력
const school_val = $("select[name='school']").val();
if(school_val == "") {
alert("학력을 선택하세요!!");
return false; // submit 을 하지 않고 종료한다.
}
// 3. 색상
const color_length = $("input:radio[name='color']:checked").length;
if(color_length == 0) {
alert("색상을 선택하세요!!");
return false; // submit 을 하지 않고 종료한다.
}
// 4. 음식
const food_length = $("input:checkbox[name='food']:checked").length;
if(food_length == 0) {
alert("선호하는 음식을 최소한 1개 이상 선택하세요!!");
return false; // submit 을 하지 않고 종료한다.
}
});// end of $("form#registerFrm").submit(function(){})------------
});// end of $(document).ready()----------------------------
</script>
</head>
<body>
<form name="registerFrm" action="<%= ctxPath%>/registerPerson.do" method="get">
<fieldset>
<legend>개인성향 테스트(POST method)</legend>
<ul>
<li>
<label for="name">성명</label>
<input type="text" name="name" placeholder="성명입력"/>
</li>
<li>
<label for="school">학력</label>
<select name="school">
<option value="">선택하세요</option>
<option>고졸</option>
<option>초대졸</option>
<option>대졸</option>
<option>대학원졸</option>
</select>
</li>
<li>
<label for="">좋아하는 색상</label>
<div>
<label for="red">빨강</label>
<input type="radio" name="color" id="red" value="red" />
<label for="blue">파랑</label>
<input type="radio" name="color" id="blue" value="blue" />
<label for="green">초록</label>
<input type="radio" name="color" id="green" value="green" />
<label for="yellow">노랑</label>
<input type="radio" name="color" id="yellow" value="yellow" />
</div>
</li>
<li>
<label for="">좋아하는 음식(다중선택)</label>
<div>
<label for="food1">짜짱면</label>
<input type="checkbox" name="food" id="food1" value="짜짱면" />
<label for="food2">짬뽕</label>
<input type="checkbox" name="food" id="food2" value="짬뽕" />
<label for="food3">탕수육</label>
<input type="checkbox" name="food" id="food3" value="탕수육" />
<label for="food4">양장피</label>
<input type="checkbox" name="food" id="food4" value="양장피" />
<label for="food5">팔보채</label>
<input type="checkbox" name="food" id="food5" value="팔보채" />
</div>
</li>
<li>
<input type="submit" value="전송" />
<input type="reset" value="취소" />
</li>
</ul>
</fieldset>
</form>
</body>
</html>
|
cs |
유효성 검사와
form태그에 <form name="registerFrm" action="<%= ctxPath%>/registerPerson.do" method="get">
action 방법을 잘 보자
1-2 <두번째 방법>
|
1
2
3
4
5
6
7
8
9
10
11
12
13
14
15
16
17
18
19
20
21
22
23
24
25
26
27
28
29
30
31
32
33
34
35
36
37
38
39
40
41
42
43
44
45
46
47
48
49
50
51
52
53
|
<%@ page language="java" contentType="text/html; charset=UTF-8"
pageEncoding="UTF-8"%>
<%
// 컨텍스트 패스명(context path name)을 알아오고자 한다.
String ctxPath = request.getContextPath();
// ctxPath => /JSPServletBegin
%>
<!DOCTYPE html>
<html>
<head>
<meta charset="UTF-8">
<title>POST 방식으로 데이터 전송하기</title>
<style type="text/css">
ul {list-style-type: none;}
li {line-height: 200%;}
</style>
<script type="text/javascript" src="<%= ctxPath%>/js/jquery-3.6.0.min.js"></script>
<script type="text/javascript">
$(document).ready(function(){
$("body > form > fieldset > ul > li:nth-child(5) > button:nth-child(1)").click(function(){
// === 유효성 검사 === //
위와가다
const frm = document.registerFrm;
frm.action = "<%=ctxPath%>/registerPerson.do";
frm.method = "post";
frm.submit();
}); // end of $("body > form > fieldset > ul > li:nth-child(5) > button:nth-child(1)").click()----------------
});// end of $(document).ready()----------------------------
</script>
</head>
<body>
<form name="registerFrm">
<fieldset>
<legend>개인성향 테스트(POST method)</legend>
위
</fieldset>
</form>
</body>
</html>
|
cs |
const frm = document.registerFrm;
frm.action = "<%=ctxPath%>/registerPerson.do"; // 여기로 보낸다 서블릿으로 데이터를 보낸다
frm.method = "post";
frm.submit();

2. 서블릿 (java) / xml아닌 어노테이션이용해서
:POST 일때만 작동하도록 만들어준 서블릿이다
registerPerson.java
|
1
2
3
4
5
6
7
8
9
10
11
12
13
14
15
16
17
18
19
20
21
22
23
24
25
26
27
28
29
30
31
32
33
34
35
36
37
38
39
40
41
42
43
44
45
46
47
48
49
50
51
52
53
54
55
56
57
58
59
60
61
62
63
64
65
66
67
68
69
70
71
72
73
74
75
76
77
78
|
package chap03;
import java.io.IOException;
import java.util.*;
import javax.servlet.RequestDispatcher;
import javax.servlet.ServletException;
import javax.servlet.annotation.WebServlet;
import javax.servlet.http.HttpServlet;
import javax.servlet.http.HttpServletRequest;
import javax.servlet.http.HttpServletResponse;
@WebServlet("/registerPerson.do")
public class RegisterPerson extends HttpServlet {
private static final long serialVersionUID = 1L;
protected void doGet(HttpServletRequest request, HttpServletResponse response) throws ServletException, IOException {
String method = request.getMethod(); // "GET 또는 POST"
System.out.println("확인용 method => " + method);
if("POST".equalsIgnoreCase(method)) {
// POST 방식으로 들어온 경우
// doPost()에서 한글이 안깨지려고
// request.setCharacterEncoding("UTF-8");을 넣어줘야 하지만
//// my.filter.EncodeFilter 필터를 작성했기 때문에 넣어줄 필요가 없다.
String name = request.getParameter("name");
String school = request.getParameter("school");
String color = request.getParameter("color");
String [] arr_food = request.getParameterValues("food");
String foodes = String.join(",", arr_food);
/*
System.out.println("확인용 name =>" + name);
System.out.println("확인용 school =>" + school);
System.out.println("확인용 color =>" + color);
System.out.println("확인용 foodes =>" + foodes);
*/
Map<String, String> paraMap = new HashMap<>();
paraMap.put("name", name); //"키값" , 밸류값
paraMap.put("school", school);
paraMap.put("color", color);
paraMap.put("foodes", foodes);
request.setAttribute("paraMap", paraMap);
RequestDispatcher dispatcher = request.getRequestDispatcher("/chap03_StandardAction/04_forward_form_view_03.jsp");
dispatcher.forward(request, response);
//04_forward_form_view_03.jsp 이곳만 포워드해주었기 때문에 여기서만 Setattribute 되어진 paraMap을 꺼내 볼 수 있다.
}
else {
// GET 방식으로 들어온 경우
RequestDispatcher dispatcher = request.getRequestDispatcher("/chap03_StandardAction/04_foward_form_error_02.jsp");
//string path : view 단(어느페이지로 보여줄래?) : jsp 페이지(에러 페이지) ->/chap03_StandardAction/04_foward_form_error_02.jsp 페이지를 잡아준것
dispatcher.forward(request, response); //dispatcher 페이지로 보내준다
}
}
protected void doPost(HttpServletRequest request, HttpServletResponse response) throws ServletException, IOException {
doGet(request, response);
}
}
|
cs |
RequestDispatcher 객체명 = request.getRequestDispatcher("보내줄 페이지");
=>보내주어서 어떤 view 단을 보여줄지, 어떤 페이지를 보여줄 지 정한다
객체명.forward(request, response);
=>포워드 해주어서 보낸다 어떤 페이지를 보여줄지 post 와 get일때 보여지는 페이지가 다르다.
3. get 방식일때 보여줄페이지
서블릿에서 보내준 게
<form name="registerFrm" action="<%= ctxPath%>/registerPerson.do" method="get"> 이거나
frm.action = "<%=ctxPath%>/registerPerson.do";
frm.method = "get";
frm.submit();
일 때
|
1
2
3
4
5
6
7
8
9
10
11
12
|
<%@ page language="java" contentType="text/html; charset=UTF-8"
pageEncoding="UTF-8"%>
<!DOCTYPE html>
<html>
<head>
<meta charset="UTF-8">
<title>GET 방식이므로 에러 페이지임</title>
</head>
<body>
<h2 style="color:red;">GET 방식이므로 에러 입니다.</h2>
</body>
</html>
|
cs |

4.POST 방식 일때 보여줄 페이지
서블릿에서 보내준 게
<form name="registerFrm" action="<%= ctxPath%>/registerPerson.do" method="post"> 이거나
frm.action = "<%=ctxPath%>/registerPerson.do";
frm.method = "post";
frm.submit();
일 때
// POST 방식으로 들어온 경우<forward>
RequestDispatcher dispatcher=request.getRequestDispatcher(""/chap03_StandardAction/04_forward_form_view_03.jsp");
dispatcher.forward(request, response); //dispatcher 페이지를 보여줘라
|
1
2
3
4
5
6
7
8
9
10
11
12
13
14
15
16
17
18
19
20
21
22
23
24
25
26
27
28
29
30
31
32
33
34
35
36
37
38
39
40
41
42
43
44
45
46
47
48
49
50
51
|
<%@ page language="java" contentType="text/html; charset=UTF-8"
pageEncoding="UTF-8"%>
<%@ page import="java.util.Map"%>
<%
Map<String, String> map = (Map<String, String>) request.getAttribute("paraMap");
//캐스팅 해주어야한다 map으로 형변환
%>
<!DOCTYPE html>
<html>
<head>
<meta charset="UTF-8">
<title>개인 성향 테스트 결과화면</title>
<style type="text/css">
span.name {
color:blue;
font-weight:bold;
}
</style>
</head>
<body>
<h2>개인 성향 테스트 결과</h2>
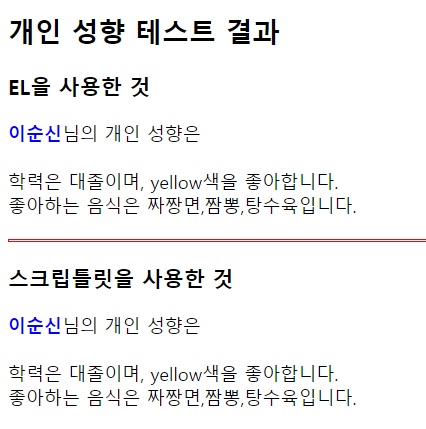
<h3>EL을 사용한 것</h3> <!--request 영역(scope)에 있는 키값 -->
<span class="name">${requestScope.paraMap.name}</span>님의 개인 성향은<br><br> <!--자바는 get하고 key값이지만 el은 .만찍고 key값하면 value가 나온다 -->
학력은 ${paraMap.school}이며, ${paraMap.color}색을 좋아합니다.<br>
<!--requestScope 생략가능 유일하니까-->
좋아하는 음식은 ${paraMap.foodes}입니다.<br>
<hr style=" border : solid 1px red; margin: 20px 0;">
<h3>스크립틀릿을 사용한 것</h3>
<span class="name"><%= map.get("name")%></span>님의 개인 성향은<br><br> <!-- put해준거 get으로 가져오기 -->
학력은 <%= map.get("school")%>이며, <%= map.get("color")%>색을 좋아합니다.<br>
좋아하는 음식은 <%= map.get("foodes")%>입니다.<br>
</body>
</html>
|
cs |
'개발자 > JSP' 카테고리의 다른 글
| [JSP 5일차] Oracle과 연동2 (0) | 2022.09.02 |
|---|---|
| [JSP 4일차]fmt/Oracle과 연동/ (0) | 2022.09.01 |
| [JSP 3일차]태그 라이브러리 /< c:choose>/<c:forEach>/forTokens (0) | 2022.08.31 |
| [JSP 3일차] DTO/useBean/커스텀액션(Custom action)/taglib(<c:set>/<c:if>) (0) | 2022.08.31 |
| [JSP 1일차]JSP란?/환경설정/현재시각/지시어(page,include)/Servlet(서블릿) 조건/jps,xml,servlet 관계 (0) | 2022.08.29 |


